
By now you’ve probably heard about sound walls and have been thinking about using one in your classroom but are not sure how to make it work best for kindergarten. There are many components and moving parts when it comes to implementing a sound wall and using Science of Reading to guide your instruction. While we highly recommend attending professional development sessions, we would like to provide some suggestions and tips here. Read on to find out more about using a sound wall in kindergarten!
We know that it can be overwhelming and confusing to figure out how to implement a sound wall in kindergarten. Especially if your district is still requiring a word wall or you have limited space and training! We will dive into how to solve these issues and more here!


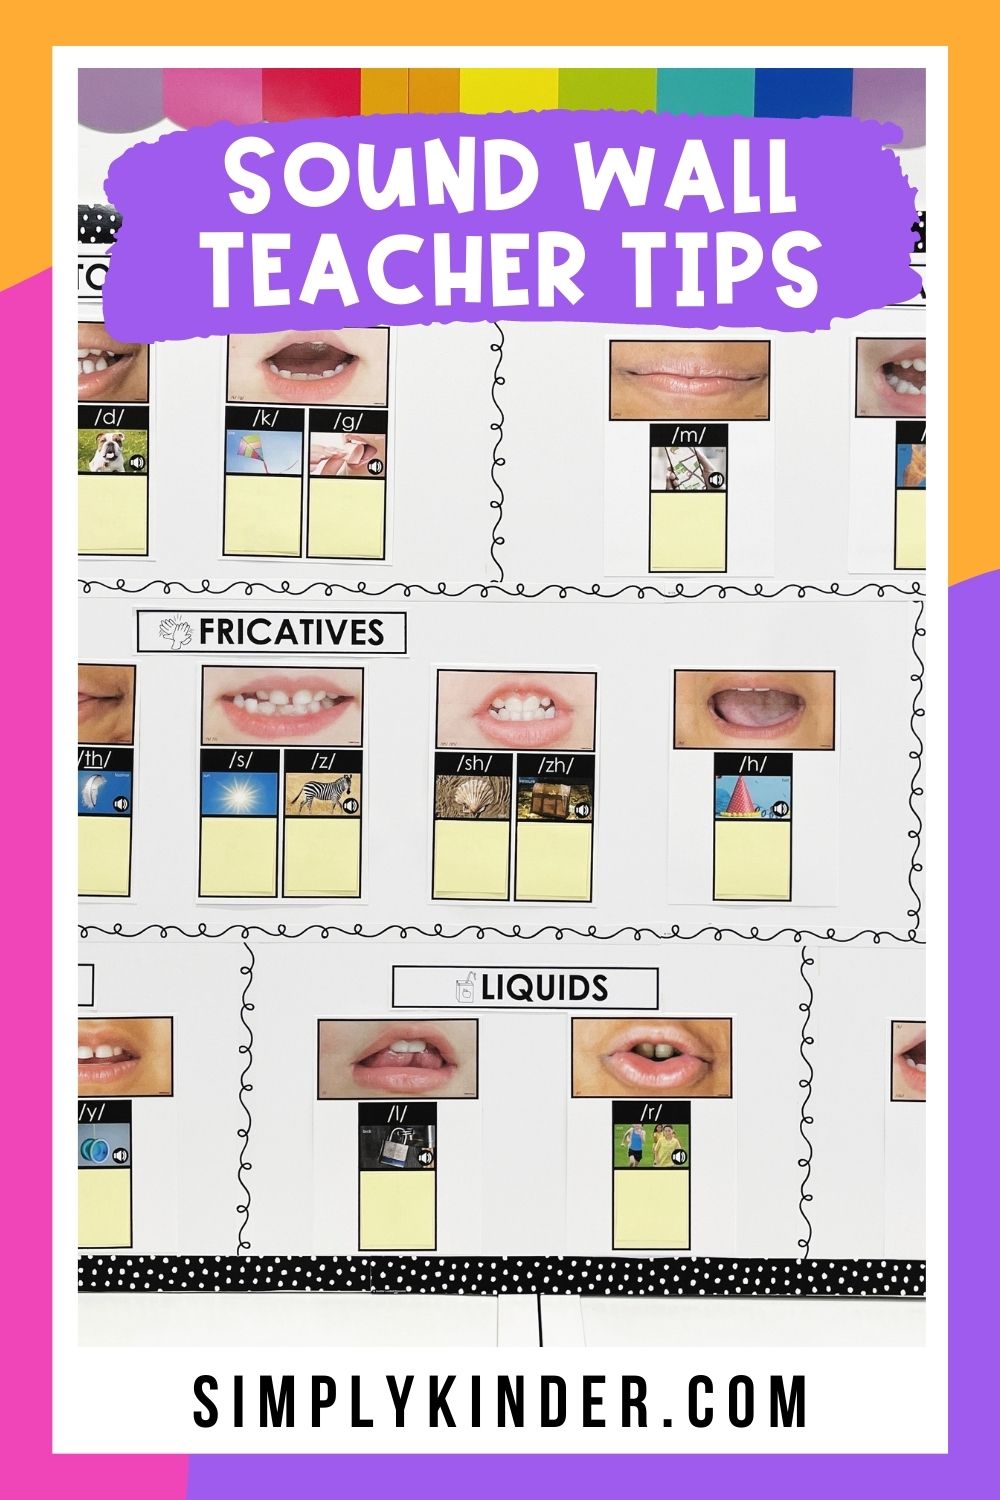
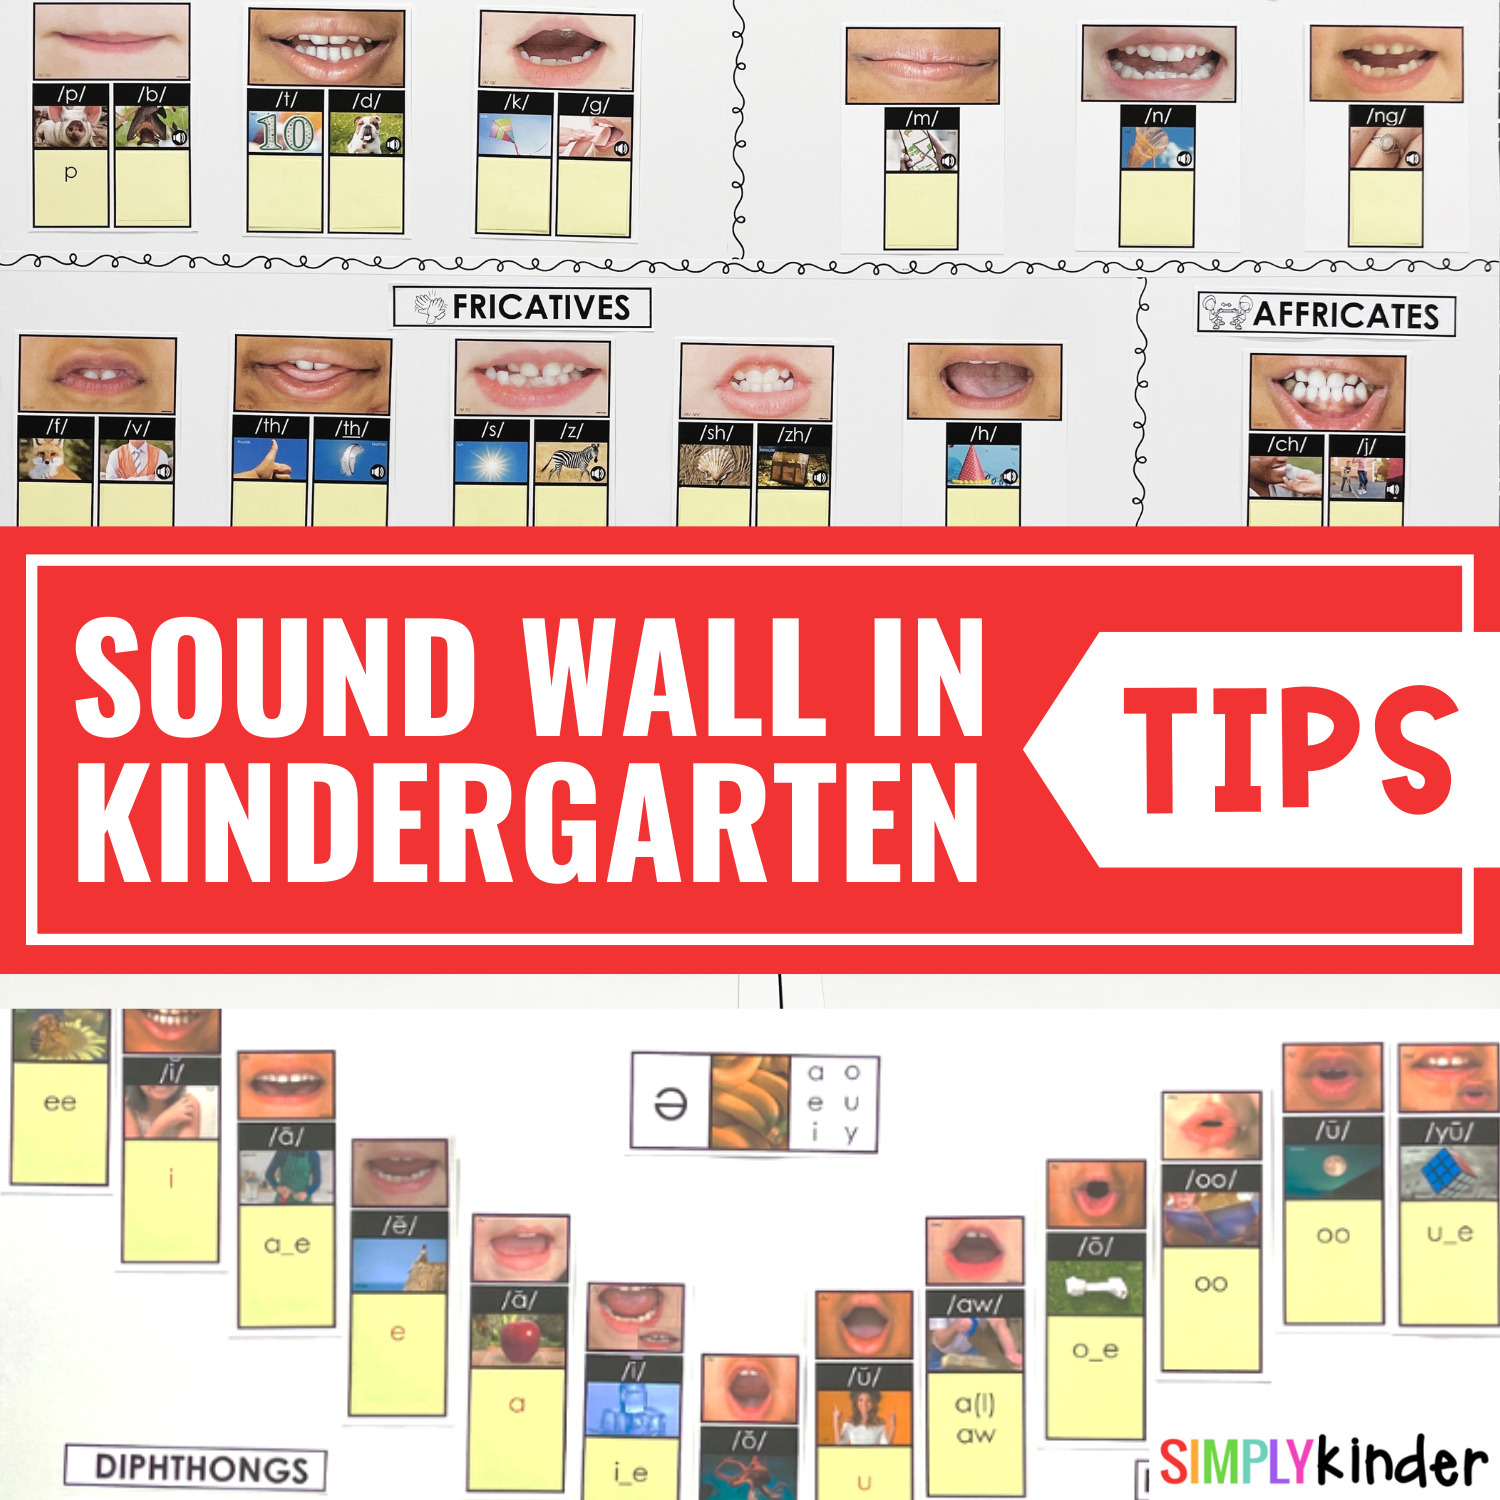
What is a Sound Wall? A sound wall is an instructional tool that organizes speech sounds (phonemes) and the letters or letter combinations (graphemes) that represent them. It shifts traditional instruction from print-to-speech to speech-to-print, which aligns with the Science of Reading. Instead of teaching the 26 alphabet letters first, a sound wall focuses on all 44 English sounds and how they’re made and represented in print.
These charts have been used for years in speech and intervention programs, but now more teachers are bringing them into the general education classroom, especially in kindergarten!
YES. We explicitly teach phonemes in kindergarten, so organizing what you teach onto a meaningful chart makes so much sense. THIS IS WHAT WE DO ALL YEAR, PEOPLE – TEACH SOUNDS! Teaching students how these sounds are made is SO KINDERGARTEN. Just remember to SLOW DOWN, don’t just show your students the letter and say this says /ă/. Instead, take time to discuss all aspects of the sounds. We can talk about where your tongue is, if your voice is on or off, if there is any air coming out, and all those other characteristics that are so important. Those rich conversations make learning sound so much more meaningful and impactful. (There, I said it.)
These charts are effective for ALL students because they are more supportive of decoding skills – making sounds, connecting sounds to graphemes (letters or letter combinations), and so much more. The sounds on these charts are organized and grouped strategically – placement of the tongue, the amount of air that comes out, etc.
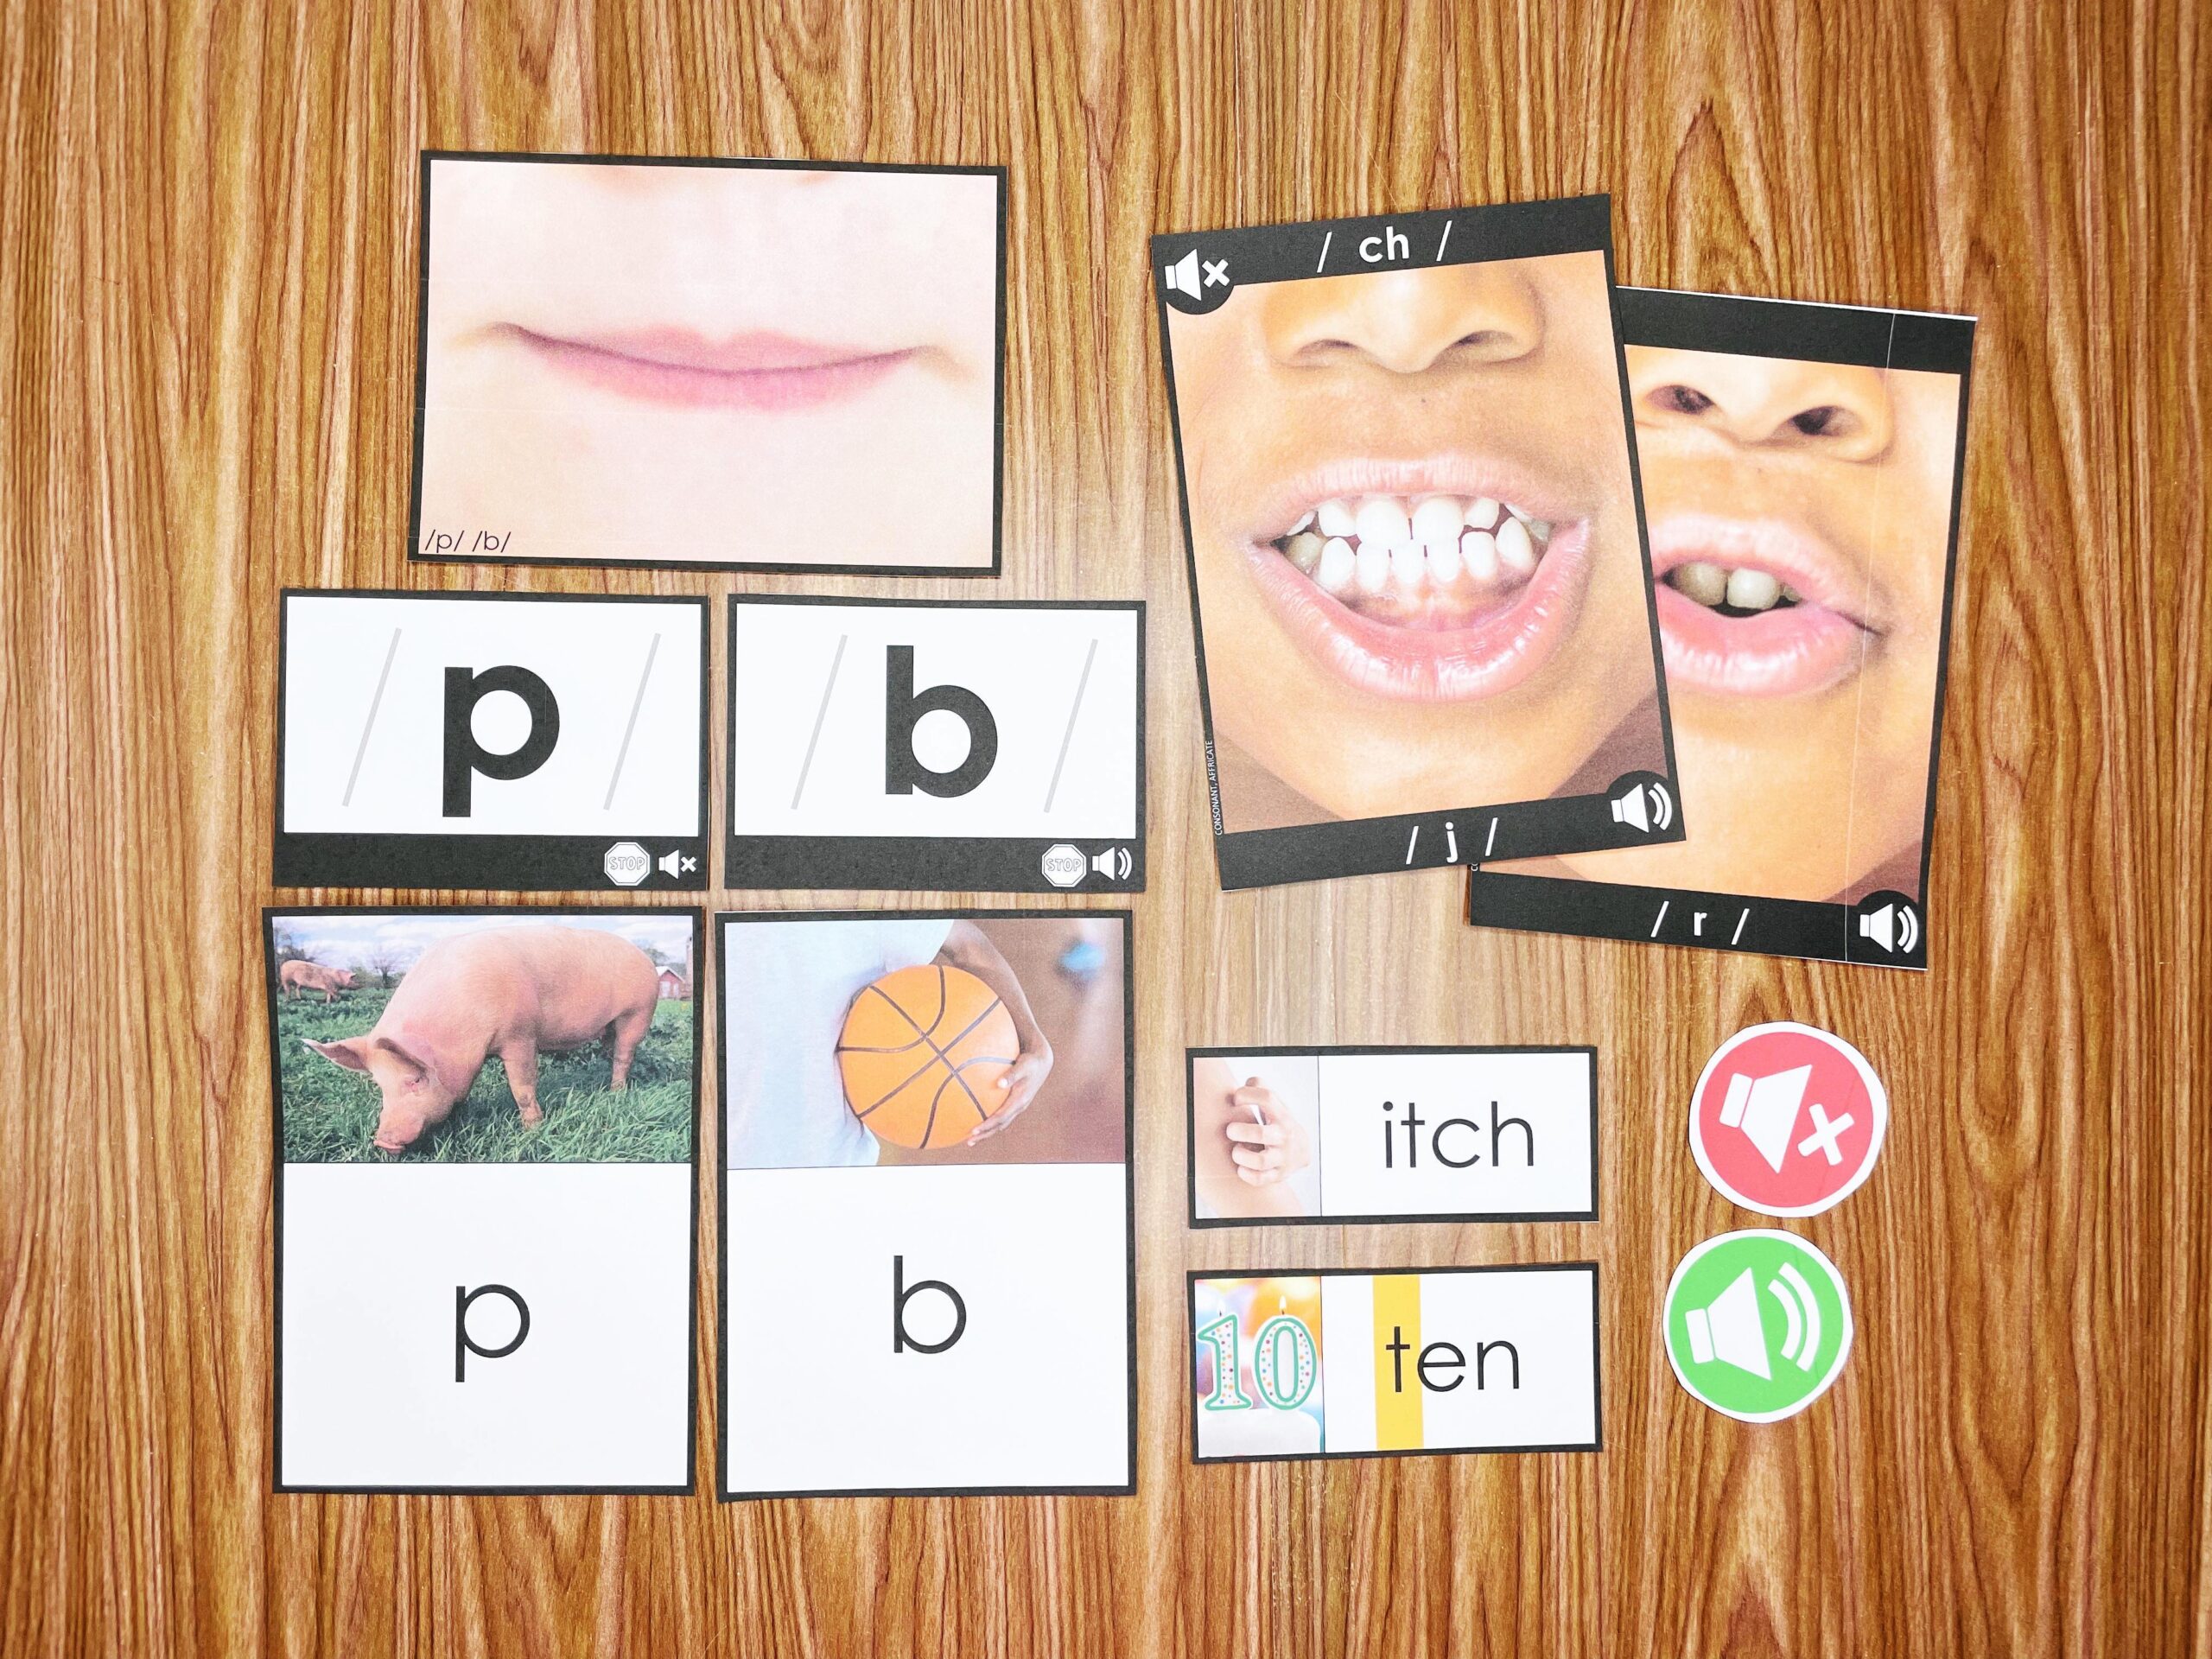
For example, the sounds /p/, /t/, and /k/ are all stop sounds where there is a quick stop of air when you make them. But we can take it a little deeper, if you make the sound /p/, you will feel it at the front of the mouth, the sound /t/ at the middle, and the sound /k/ at the back. The chart organizes these sounds together so we can learn and talk about all of those characteristics.
For more Science of Reading definitions for teachers, click here.
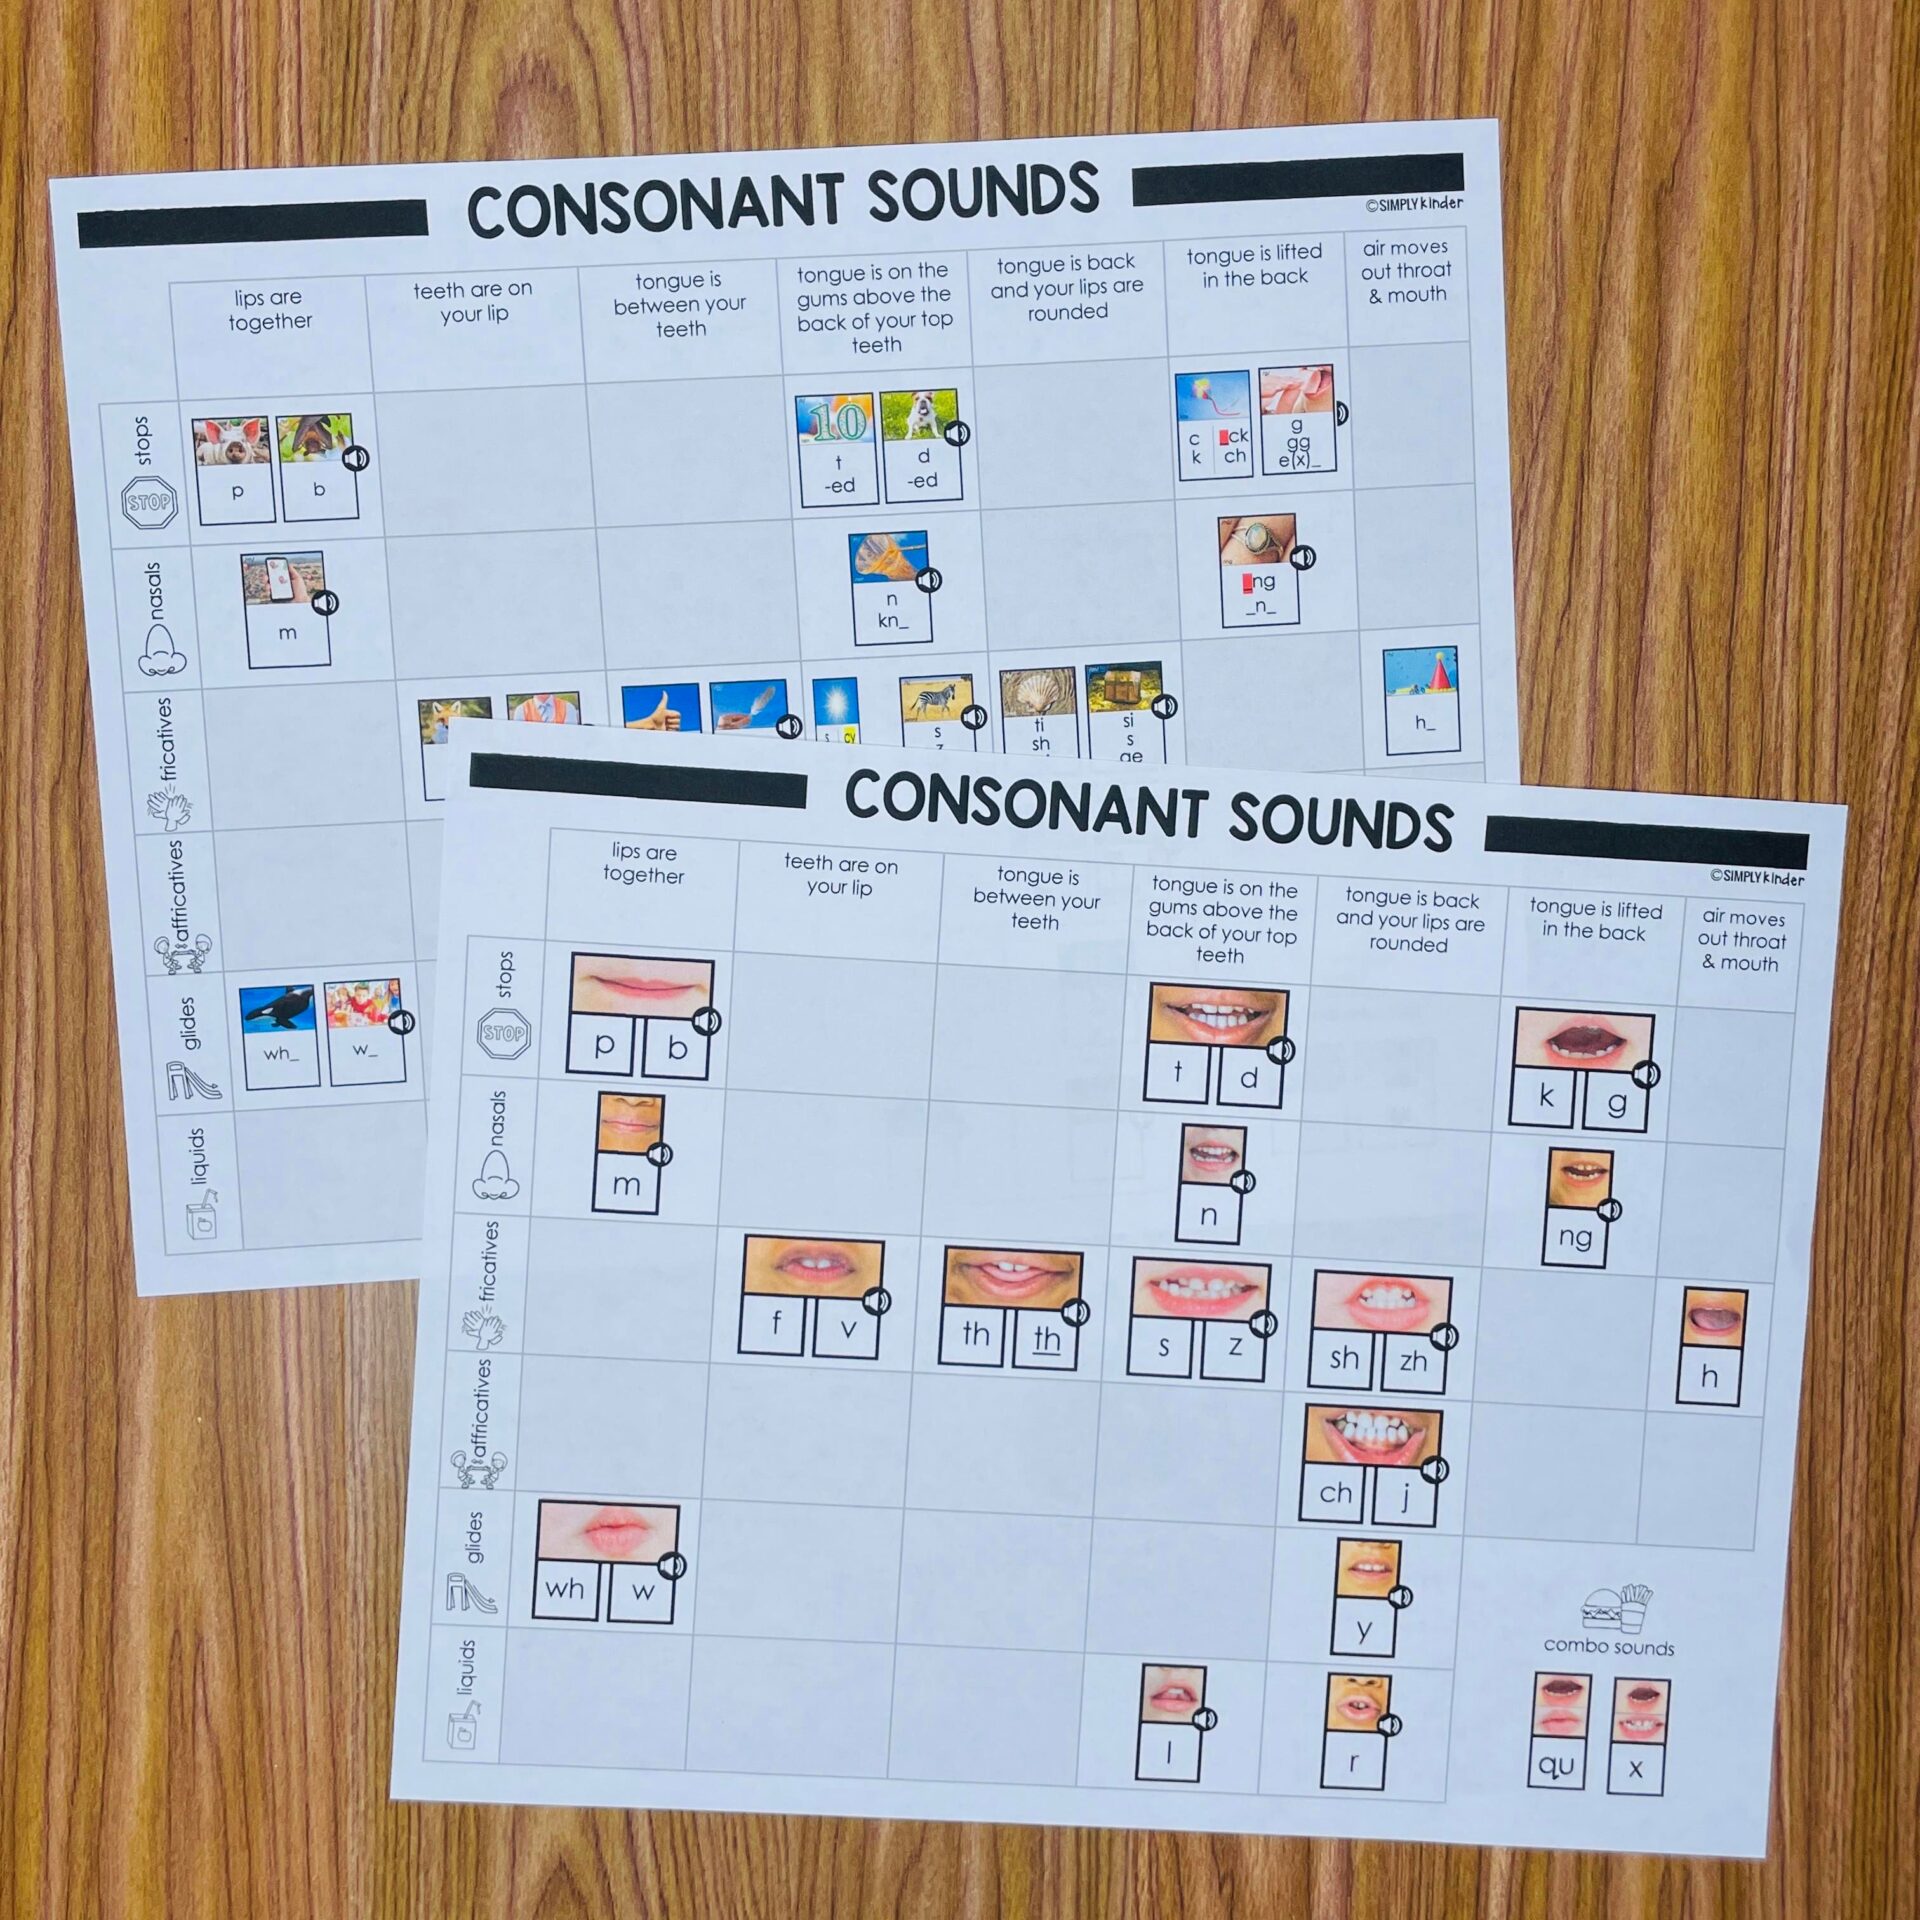
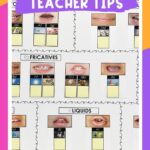
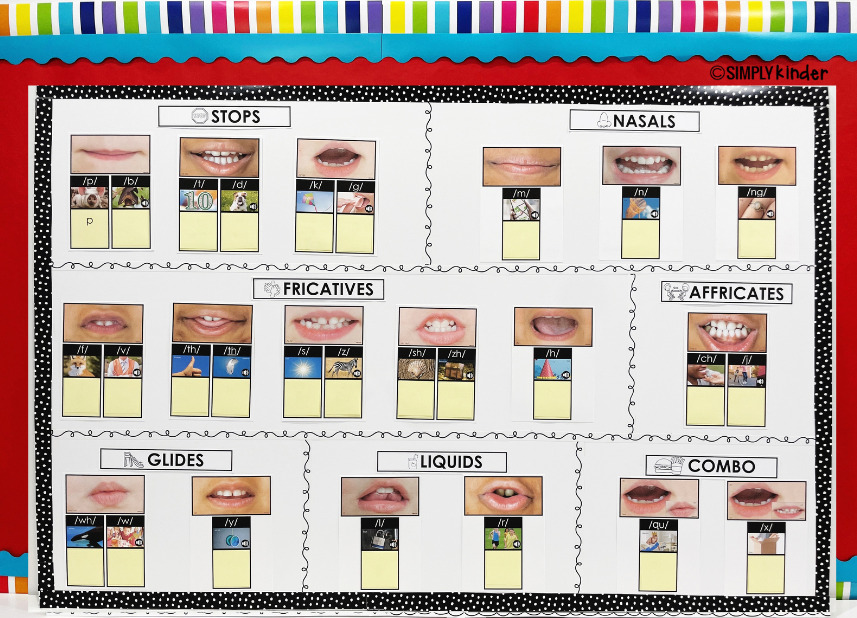
Let’s talk about consonants. Consonants are grouped by how the sound is made and mouth placement. These could be organized into a chart so you could see which sounds are made with rounded lips, etc. But because of wall space, it may not be practical for you to create your display this way.
There are six types of consonants (well, seven if you count the combos).
*** Some programs will combine Fricatives and Affricates and call them Continuants.
Then, with all those sounds, you have mouth placements to consider.
With all of these details, you can really have rich conversations about the sounds. But let’s talk about space, the above chart will take up SO much room to get the right spacing and so many empty sections – it’s just not very practical in every classroom.
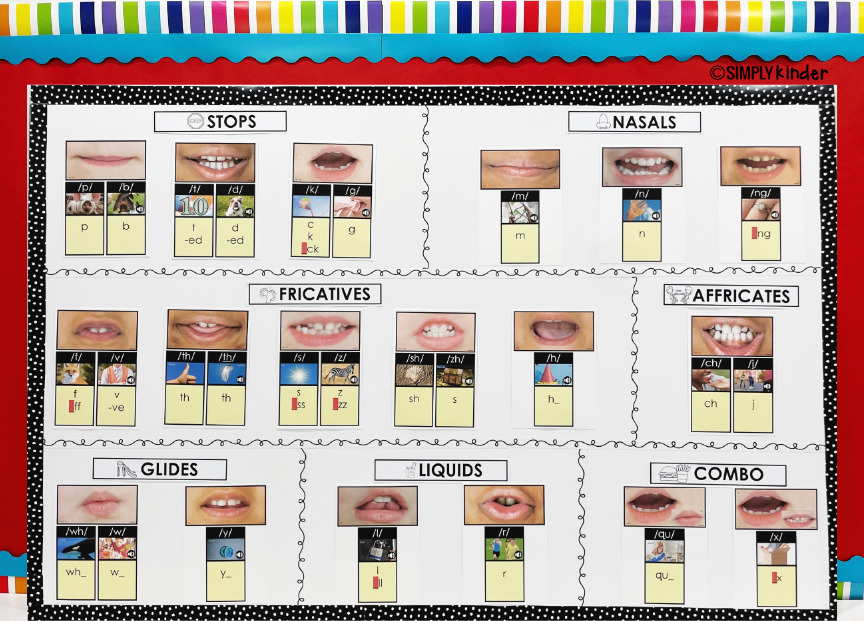
We are seeing many teachers arrange their consonant sound walls as above, grouping the correct sounds together and ordering them the same within that section. This is a great option if you are not able to organize your chart like the first one.
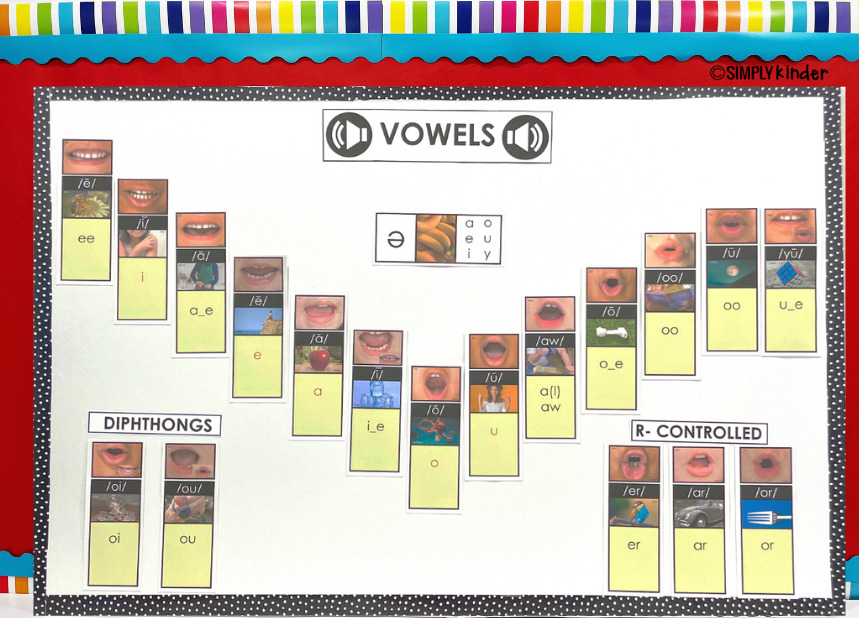
Let’s talk about vowels. The vowel chart is really cool. The letters are in a V because your jaw will drop as you make the sounds in that order. It starts with the long e sound with very wide lip placement. It goes down to a wide-open short o sound and then back up the pucker-shaped /yu/ sound. If you make the sounds aloud in that V, you will feel your jaw drop and go back up.
It’s kindergarten, though, and we don’t traditionally teach all those vowel sounds. Students can handle exposure to these sounds, but just because you expose them to the sound orally does not mean you have to show them those spelling patterns. Keep the chart’s integrity with the articulation photos and just keep those more advanced sounds in picture form. But we have seen some just display the short or long vowels and just suggest you leave them in order if you do that.
This is what we suggest…
Decisions you will have to make (and our thoughts in italics)…
Things you can add or uncover as you teach…
In kindergarten, a sound wall is a tool you build together because sounds and letters is what we teach. We suggest putting the structure there so you have it all spaced out correctly and then adding the sounds as you talk about them.
Like we talked about before, most teachers don’t really have room to organize by mouth placement and other characteristics so we just grouped them together. We spaced them all out to make sure we had room to add what we needed to add. We started with just the group labels and locks for the mouth sounds. As we teach the sounds we will then add the mouth photo.
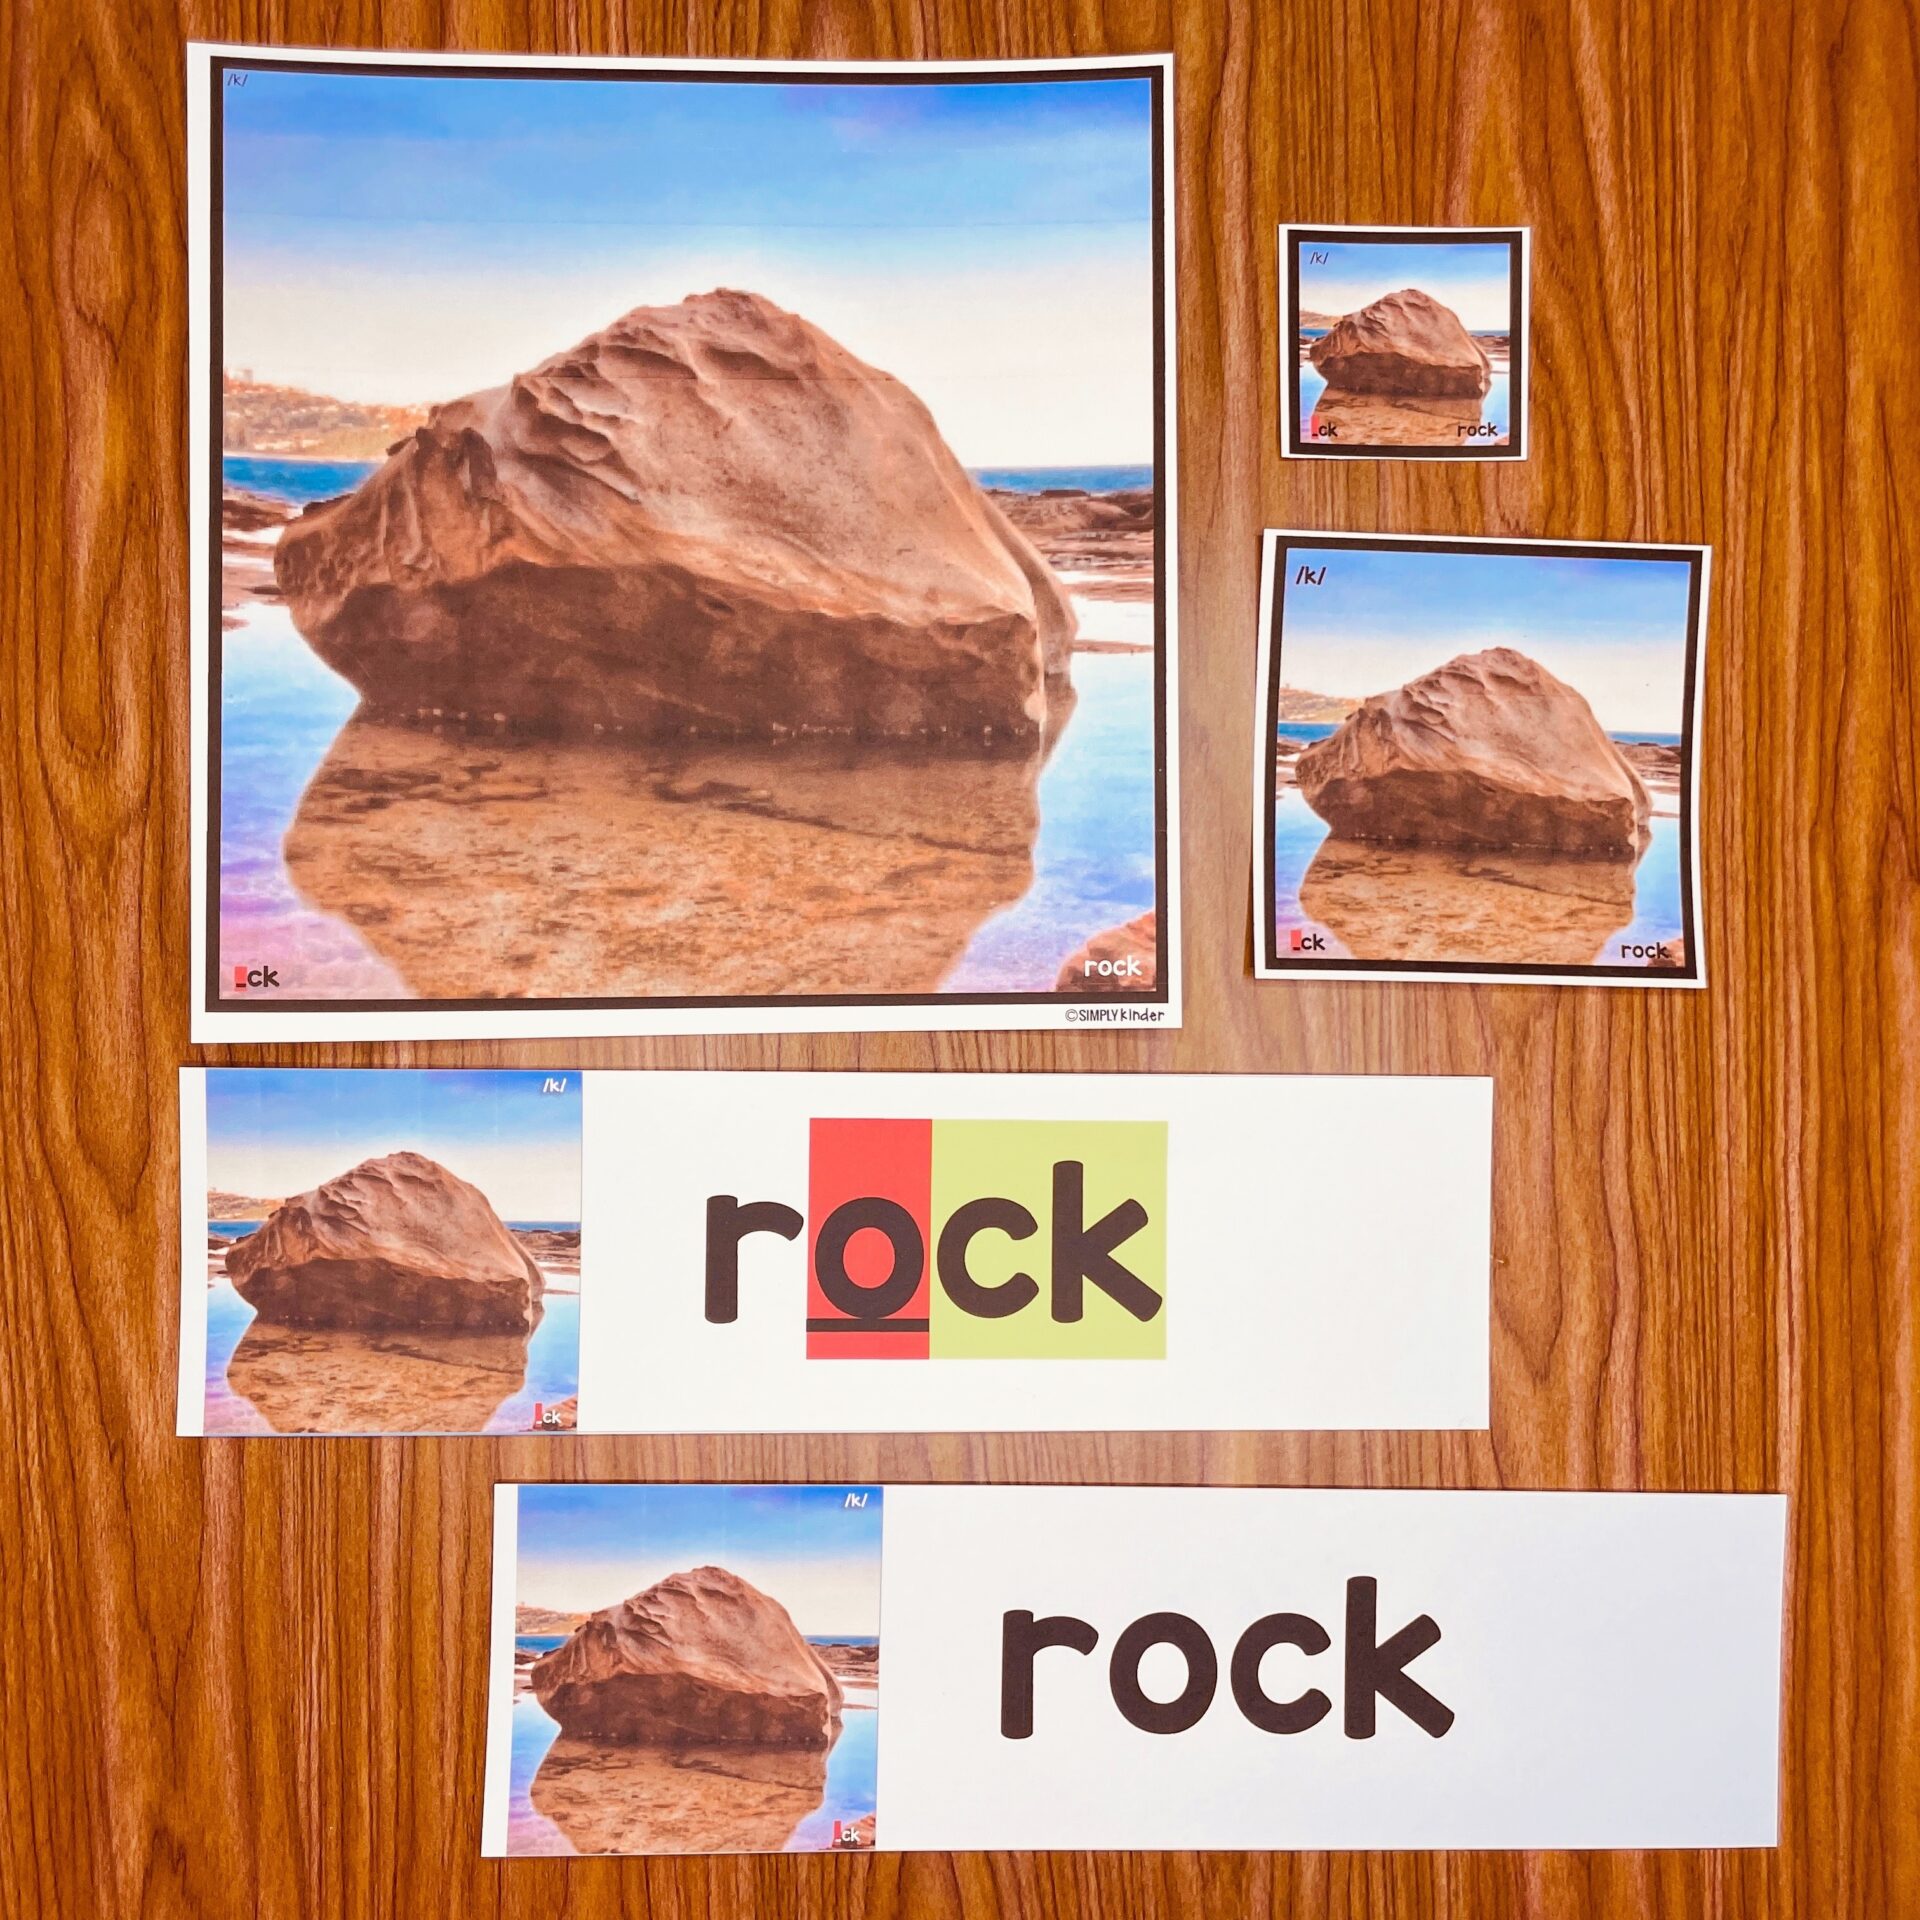
And then from there, you need to determine if you want to add the spelling patterns. I think our natural instinct is to do that quickly, but if we are going from speech to print we may want to slow it down and add the graphemes later. Either way, by just adding the locks for the mouth photos, you are not overwhelming students with all sorts of sounds and you are leaving lots of space to see what spelling pattern cards will work with your students.
FREQUENTLY ASKED QUESTION: What order do I teach them in? Honestly, I would follow the scope and sequence of your district or curriculum. If you don’t have a scope and sequence we suggest following the Recipe for Reading scope and sequence.
And then this is what you will end up with when all the sounds and graphemes are instructed.
Some additional thoughts about adjusting for kindergarten….
Again, it’s kindergarten so you are already teaching the sounds. The sound wall helps you have richer conversations about the sounds so students can make deeper connections to the content and thus apply the skills when decoding. A sound wall will help you teach the sounds more in-depth and in multisensory ways.
-What’s happening with your lips?
-Is the sound voiced or unvoiced? (Put your hand on your throat to see).
-What’s happening with your tongue?
-Do you feel any vibration on your nose?
-What’s happening with your teeth?
-What else do you notice when you make this sound?
-What’s happening with your breath?
This video is a great review for all 44 phonemes (and a great reference tool if you are looking for support on how to make each of the sounds as the teacher).

We get the same questions sometimes and so we wanted to make a place for those. Don’t see your question – just message us and ask and we will do our best to support you. Here we go…
Is there a right and wrong way to do it?
Well, I am probably going to get stones thrown at me, but I am going to say no. There is the Science of Reading body of knowledge and that is ever-changing as research and additional discoverings come out. I feel like as long as you are making steps forward you are doing good. As we learn new things, we may tweak or alter things and that is OK. As teachers, we need to give ourselves (and each other) some grace and understanding that we don’t have to know everything perfectly. We will make mistakes and that’s ok. This all being said, we highly recommend you doing some training on sound walls.
Do I need to get rid of my alphabet/word wall?
This is up to you. Sound walls and alphabet walls both serve a purpose. If you had to pick one over the other because of space or whatever, I would go with a sound wall because it is more impactful. Maybe consider making your word wall smaller, maybe just doing some seasonal vocabulary in your writing center, or posting your sight words on a pocket chart somewhere in your room.
SOUND WALL
WORD WALL
As far as your alphabet being posted in ABC order, I would 100% still keep that in your kindergarten classroom. There are so many great activities, songs, and games you can play with them for letters and sounds.
This is one of those things where I fear we don’t want to throw the baby out with the bathwater.
Should I post sight words along with a sound wall?
A sound wall is meant to be a reference, not something you “add” more to. Each item under the sounds is intentional showing the spelling patterns for that sound. This being said, no, you should not add sight words to your sound wall. Also, we would suggest teaching students how to decode sight words. Stay tuned for more details and suggestions on sight word instruction.
Do you have additional questions that were not answered? Comment here or join the conversation inside the Simply Kinder Teachers Facebook group here. Teachers are also posting pictures of their sounds walls there!